Important general information
- Make sure your social media connections are properly configured on the settings page before creating a new show, this is to ensure that the settings are propagated correctly
- Expect a delay between 15-45 seconds before the show is live on chosen platforms. Likewise, expect a delay after you stop a broadcast for the show to go offline
- External cameras, pre-recorded, and landscape mode is supported
- Curtains or any other overlay elements are not supported
MODERATION: You will handle the chat moderation on each social media platform. For example, if you have comments and chat activity on Facebook, you need to answer and moderate Facebook.
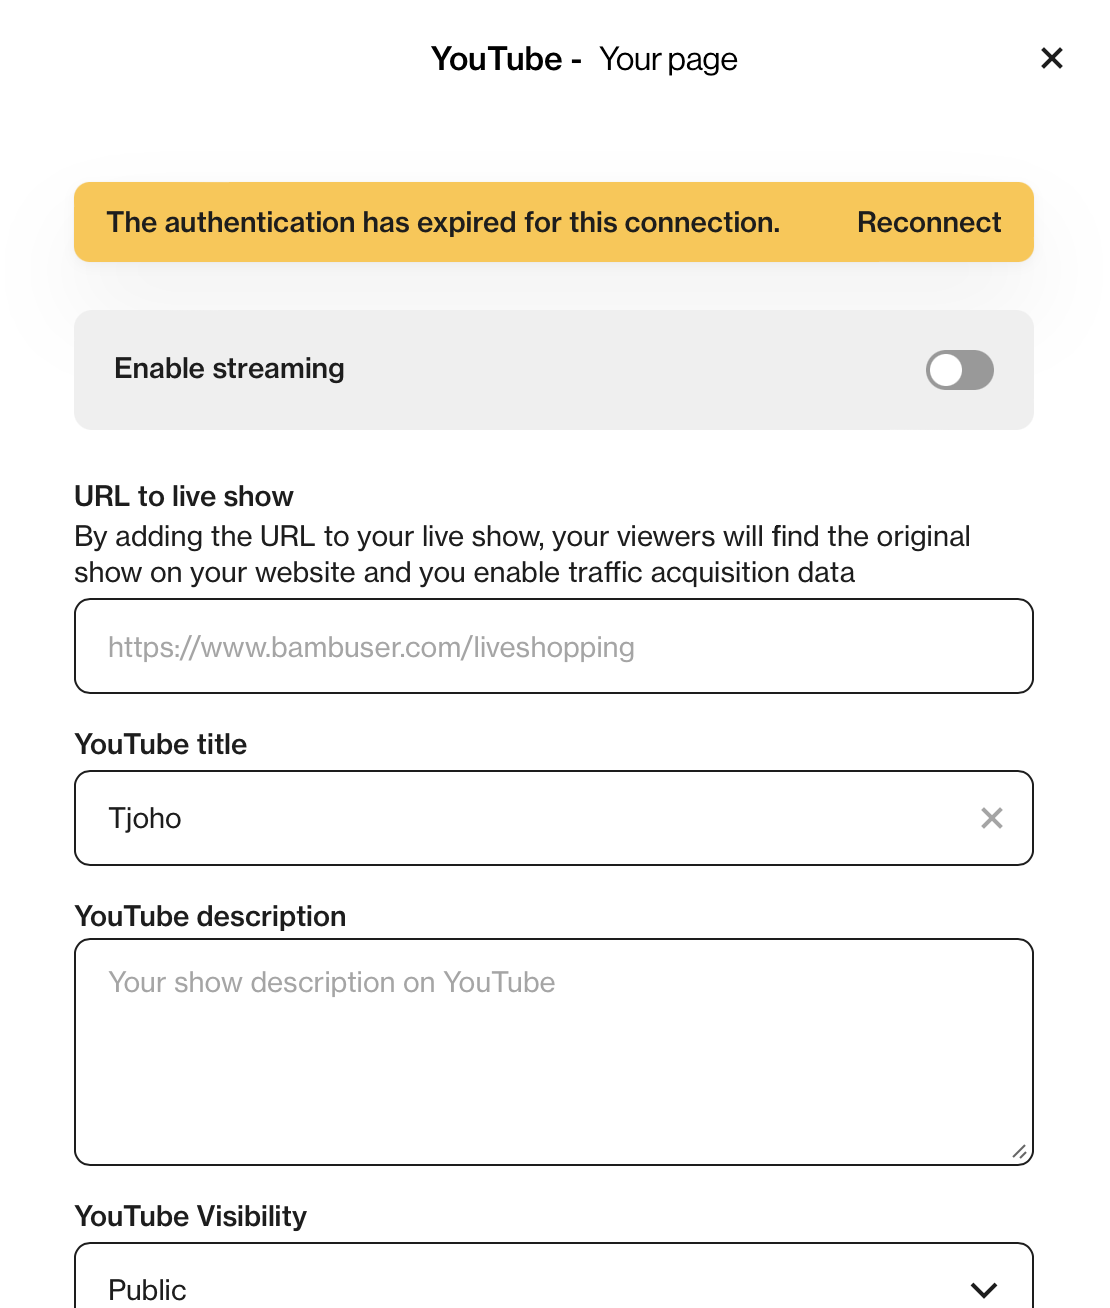
Your connection can expire. Before going live, make sure that your chosen connection is connected. You can easily reconnect in the dashboard.
|
 |
1. What is Social Media Multistream?
Bambuser’s Social Media Multistream feature allows clients to go live on multiple platforms at once. The feature enables multistreaming of live-video content to Facebook and YouTube: as well as via custom RTMP to any platform that provides a stream URL and stream key. Only the “raw” live video will be forwarded i.e., no chat, no product highlights, no likes, etc.

2. What social platforms does Bambuser support?
Bambuser allows you to stream your live events from your website to your social pages simultaneously. Connect your account with an easy to use plug-and-play feature to stream across:
- YouTube
- Or RTMP directly to whatever platform that supports RTMP streaming, like Instagram, LinkedIn, Twitter, & more!
For information on how to enable Social Selling, where the link to a product's PDP page is sent straight to the shopper, please read this article.
Tracking Link: Important Information
Please note: It is important to provide the correct embed URL during setup. We will then append certain query parameters on this URL automatically when the URL is shared with your viewers. The additional parameters that will be added to the URL will ensure that Facebook (or other social media) viewers can find the main live show on your website and to enable data tracking. Otherwise (if they don't go to your website), they will lose some of the perks of the real live video shopping experience like being able to shop directly through the player and interact with the host(s).
Example of "URL to Live Show" you add in Bambuser dashboard:
https://www.example.com/landing-page
URL that your customers will click on will automatically be transferred to something like this:
https://www.example.com/landing-page?autoplayLiveShopping=SHOW_ID&socialMediaLiveshopping=Facebook
Label definitions
Here are some important definitions to understand before you start streaming.
- STOPPED: The forwarded stream has ended successfully.
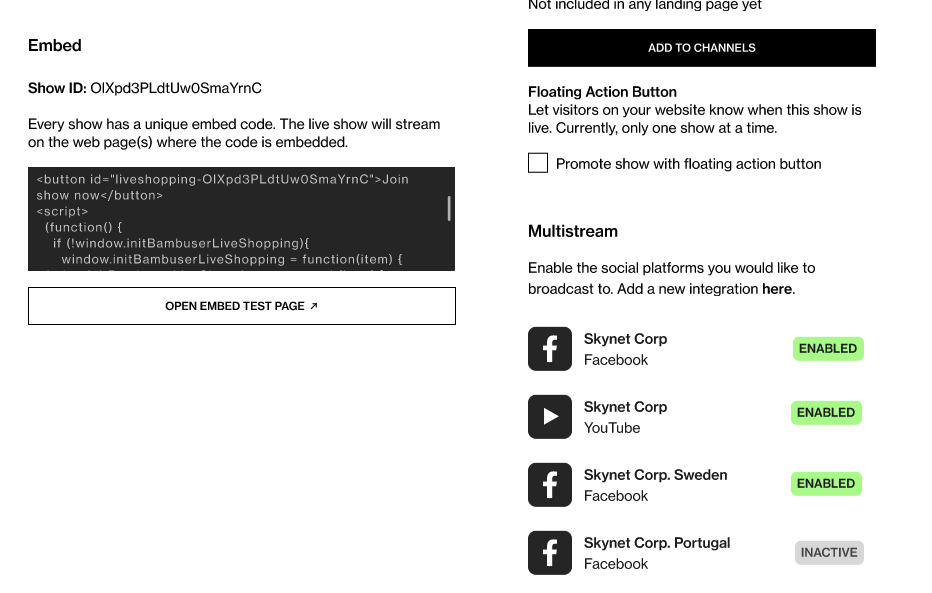
- INACTIVE: Multistreaming connection is not enabled.
- ENABLED: Multistreaming connection is enabled.
- STREAM ERROR: There was an error with the forwarded stream.
- EXPIRED: The connection token has expired. Please set up your connection again.
- RECONNECTING: The system is attempting to re-establish the connection between accounts.
- STARTING: The stream is beginning to be forwarded.
3. Connect & stream to Facebook
Let's start with Facebook and how to connect a page or multiple. Go to settings, and click Facebook.
- Click the "Connect" button to the left
- Select your Facebook account, which has admin or editor access to the Facebook page(s) you would like to stream to
- Select the pages you wish to grant Bambuser access to
- Allow all permissions requested in the dialog
- After finishing the flow on Facebook, you will be redirected back to the Bambuser dashboard
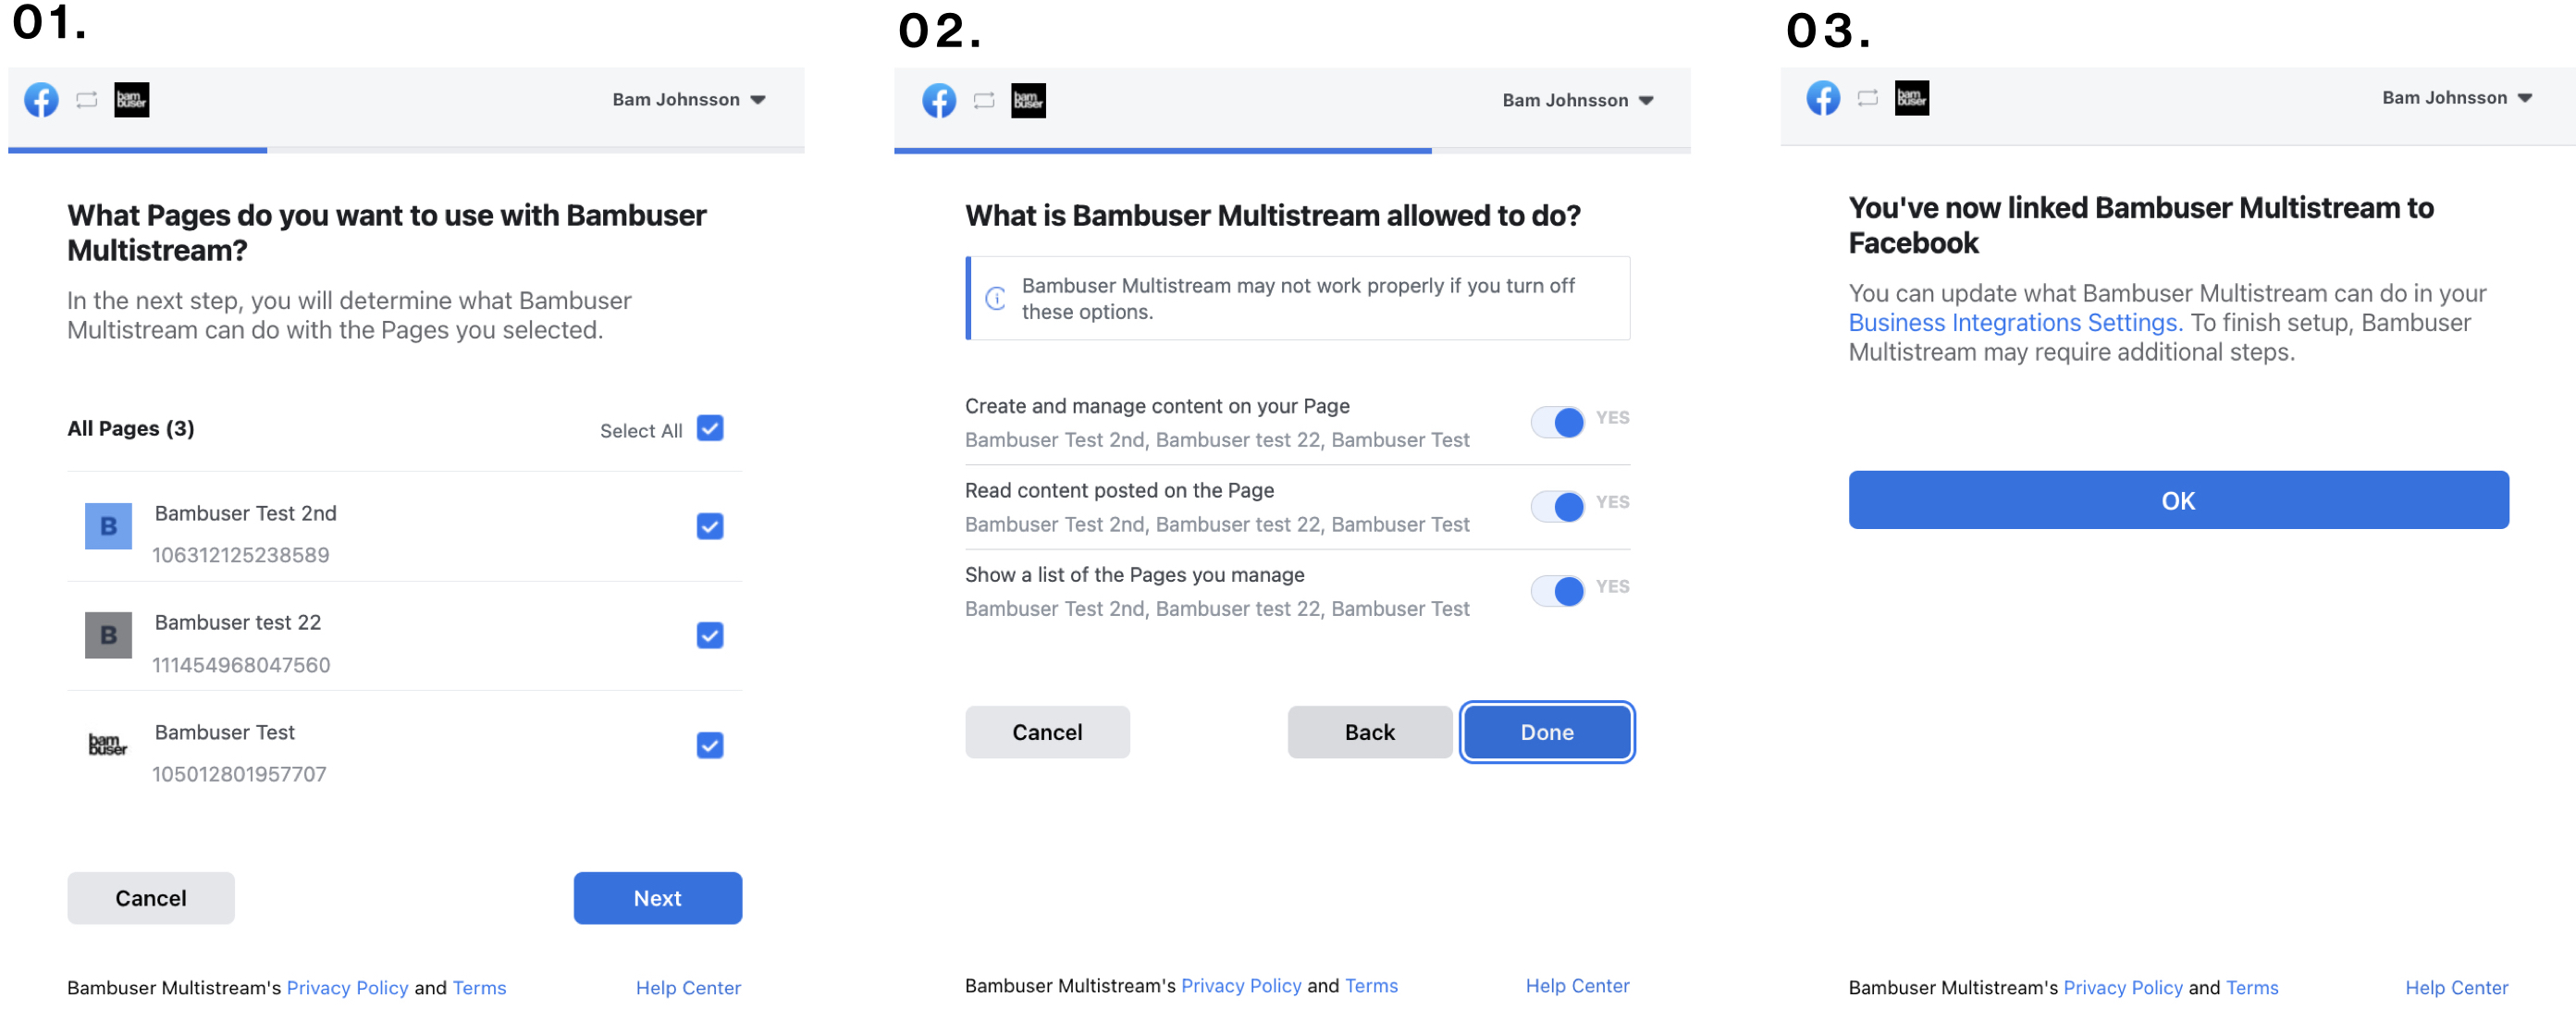
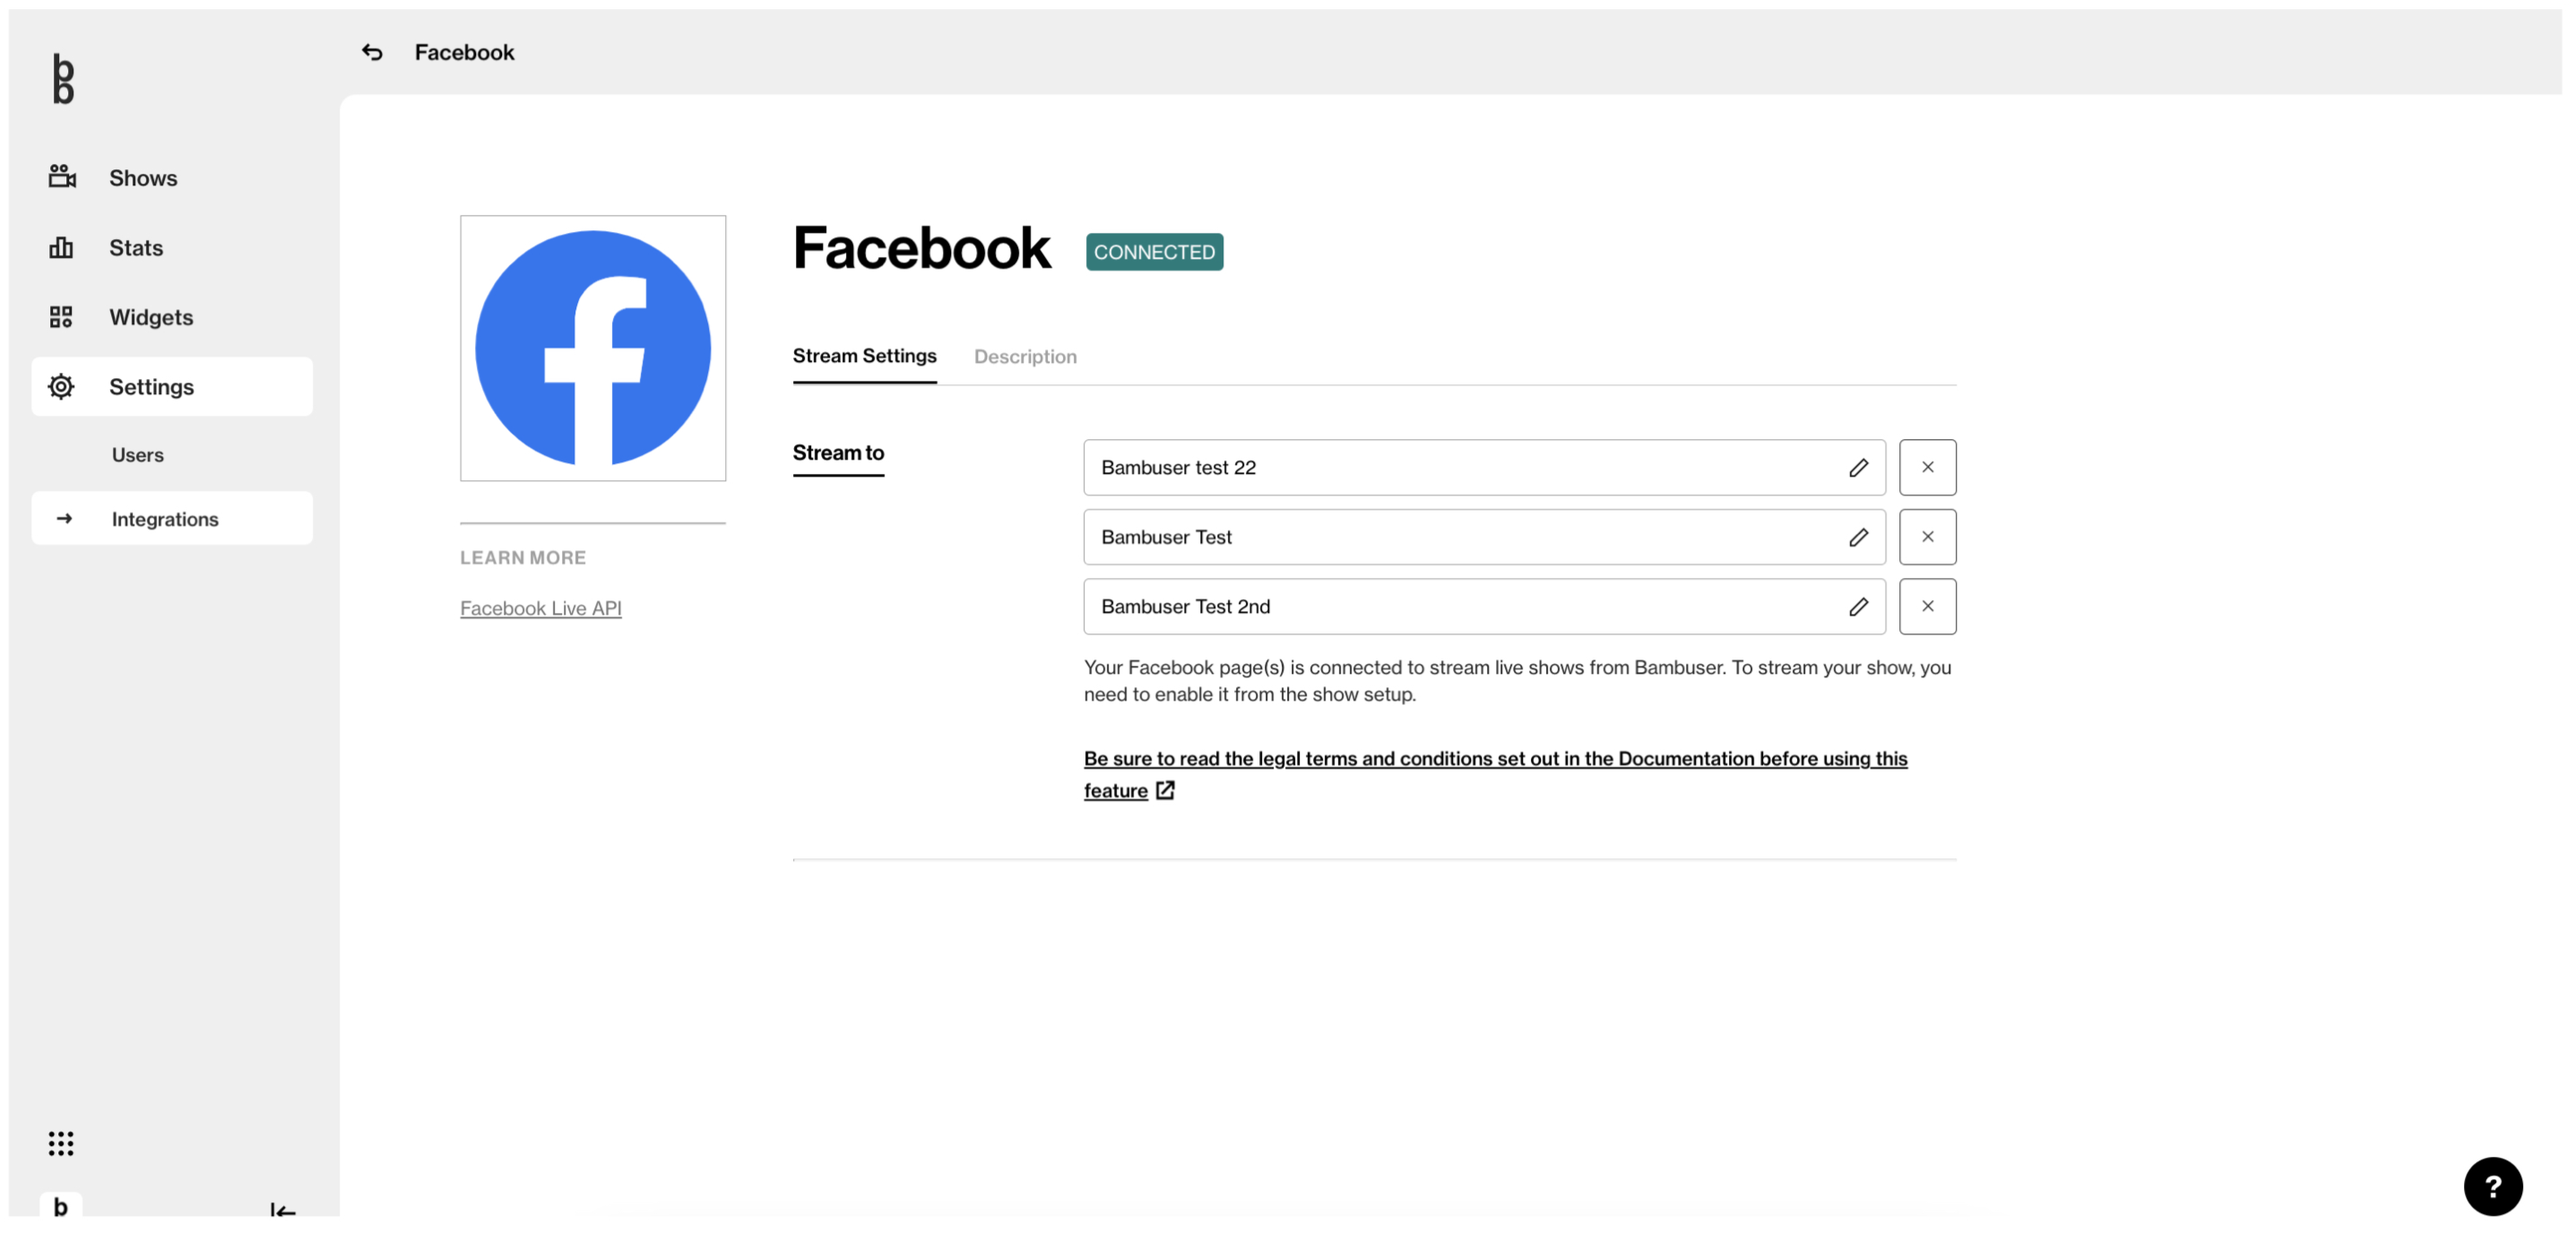
This is the expected result, as the three pages are now linked!
How to stream to Facebook
Once you have connected the chosen account, it's time to connect the page/pages to your show.
- Navigate to the show setup page
- Beneath the label ‘Stream to other platforms, click the "Choose Platform" button
- Select the platform you would like to stream to. In this case, it is Facebook.
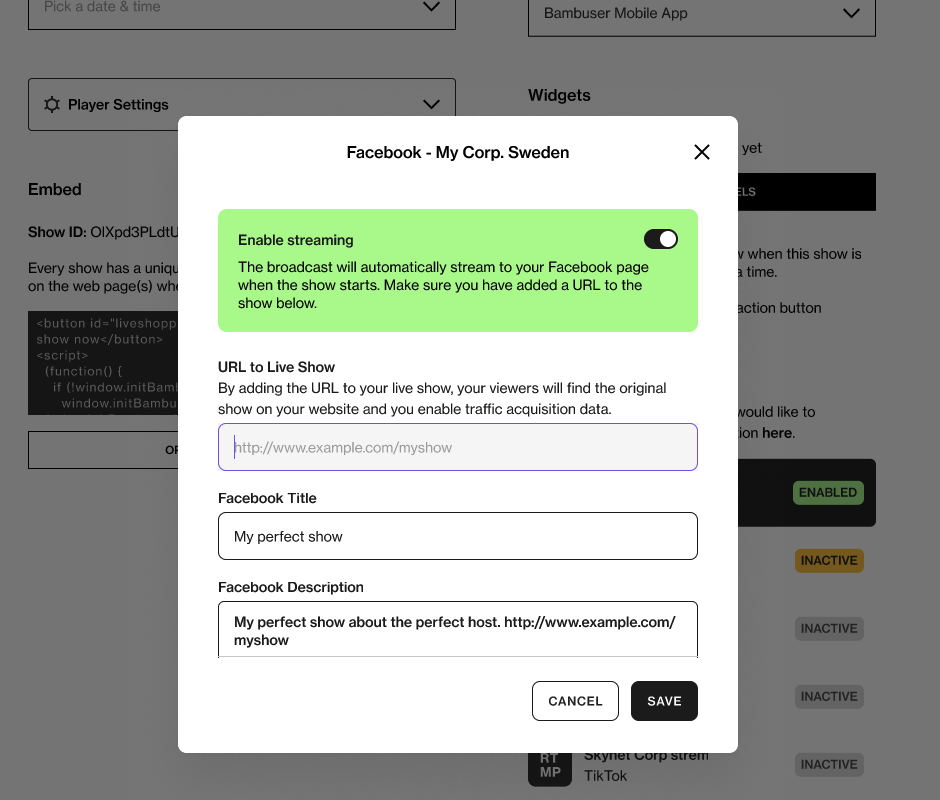
- Fill in all the fields
- Embed URL: Add the URL to where the player is embedded. When you enter the URL, we will include it in the Facebook stream to make sure the viewer can navigate to the main show. The Embed URL will be appended to the description.
- Title: This will be the title of the Facebook stream
- Description: This will be the description of the Facebook stream
- Use the switch to toggle the feature on or off for the particular show
 |
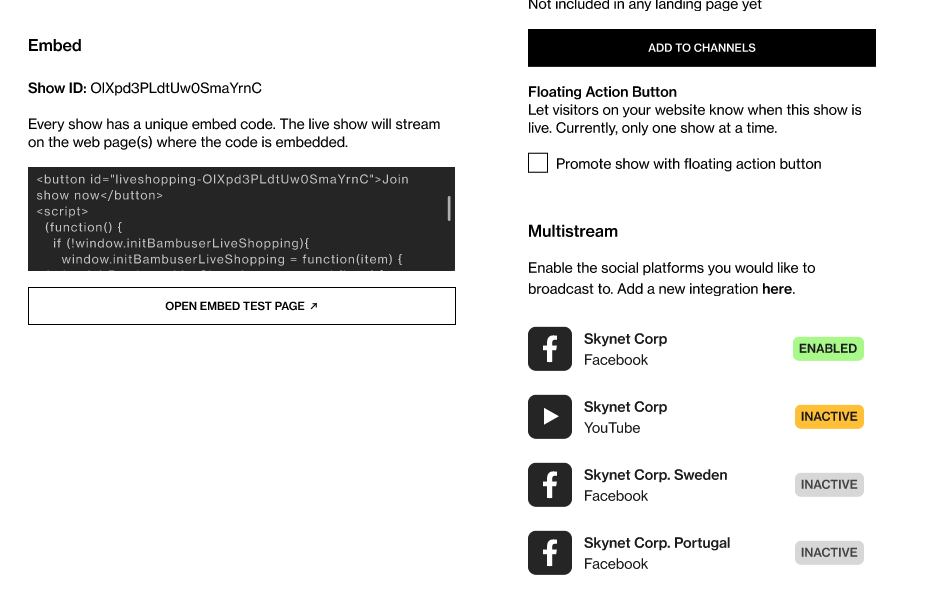 |
Please note: It is important to provide the correct embed URL during setup. This is to ensure that Facebook viewers can find the main live show on your website and to enable data tracking. Otherwise, they will lose some of the perks of the real live video shopping experience like being able to shop directly through the player and interact with the host(s). See the example above!
To optimize the traffic acquisition data classification, we have “reserved” the following url parameters shareLiveShopping and socialMediaLiveshopping. If the URL to live show contains both shareLiveShopping and socialMediaLiveshopping, the socialMediaLiveshopping parameter will trump the shareLiveShopping one, which means that that particular click/viewer will be classified as Multistreaming traffic in the Traffic Acquisition data in the Dashboard/public API
Important Facebook information
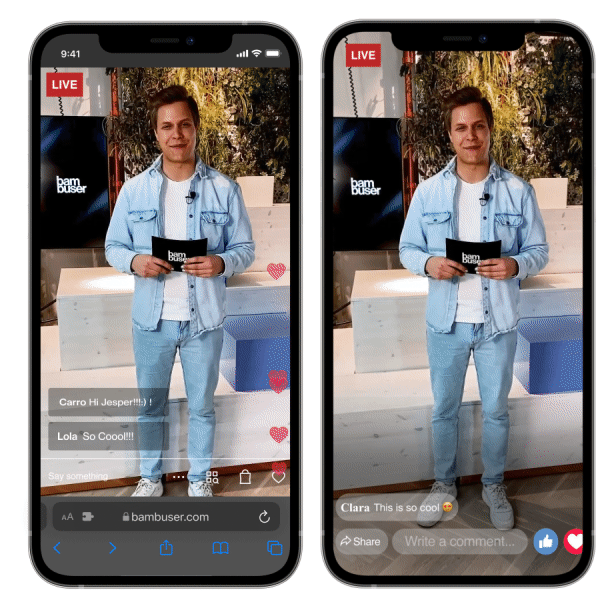
- Facebook supports both landscape and portrait mode in high quality
In order to test the Facebook integration, the easiest method is to create a new test page and confirm it's set to private/unpublished. Connect the page as described above and confirm everything is working as you expect.
If you have multiple Facebook pages with similar names you may edit your connections by clicking the pencil (see screenshot above) and setting a custom display name, this makes it easier to distinguish between pages.
Remember that you must have the Admin role on the given Facebook page in order to connect it with Bambuser.
4. Connect & stream to YouTube
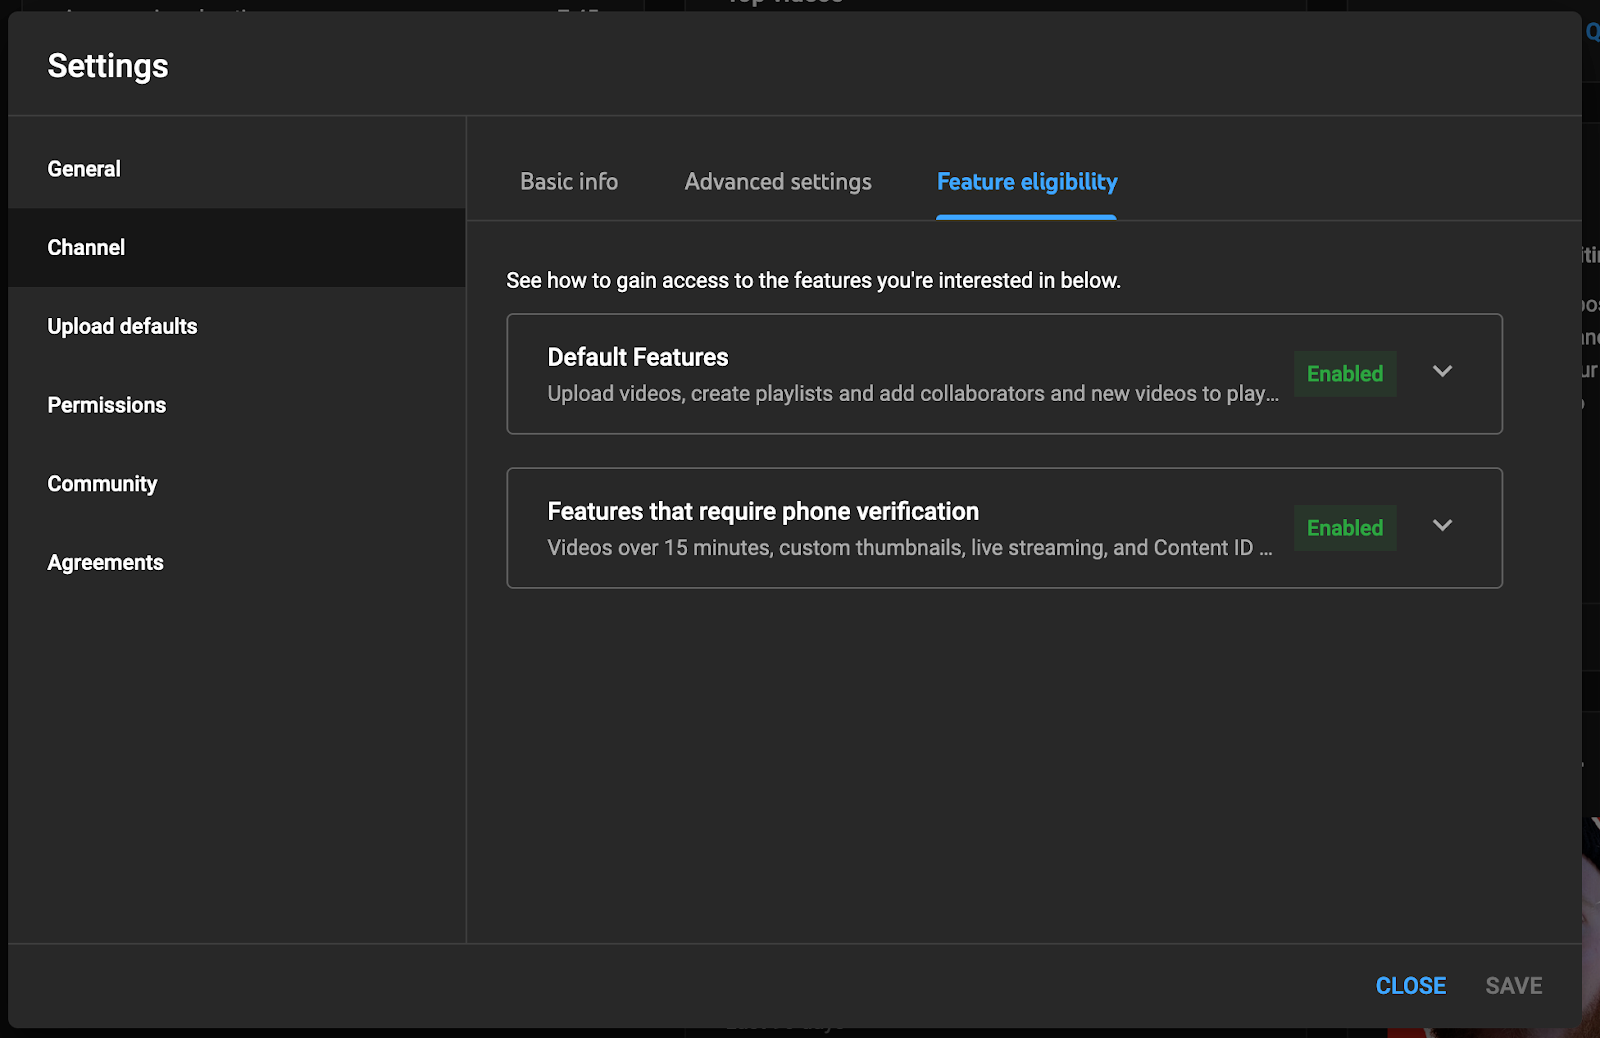
Before setting up your connection you must verify your YouTube account by visiting www.youtube.com/verify and then make sure you have enabled “Features that require phone verification”, it takes 24 hours for YouTube to approve this request, see below:
Let's explore how to connect a channel:
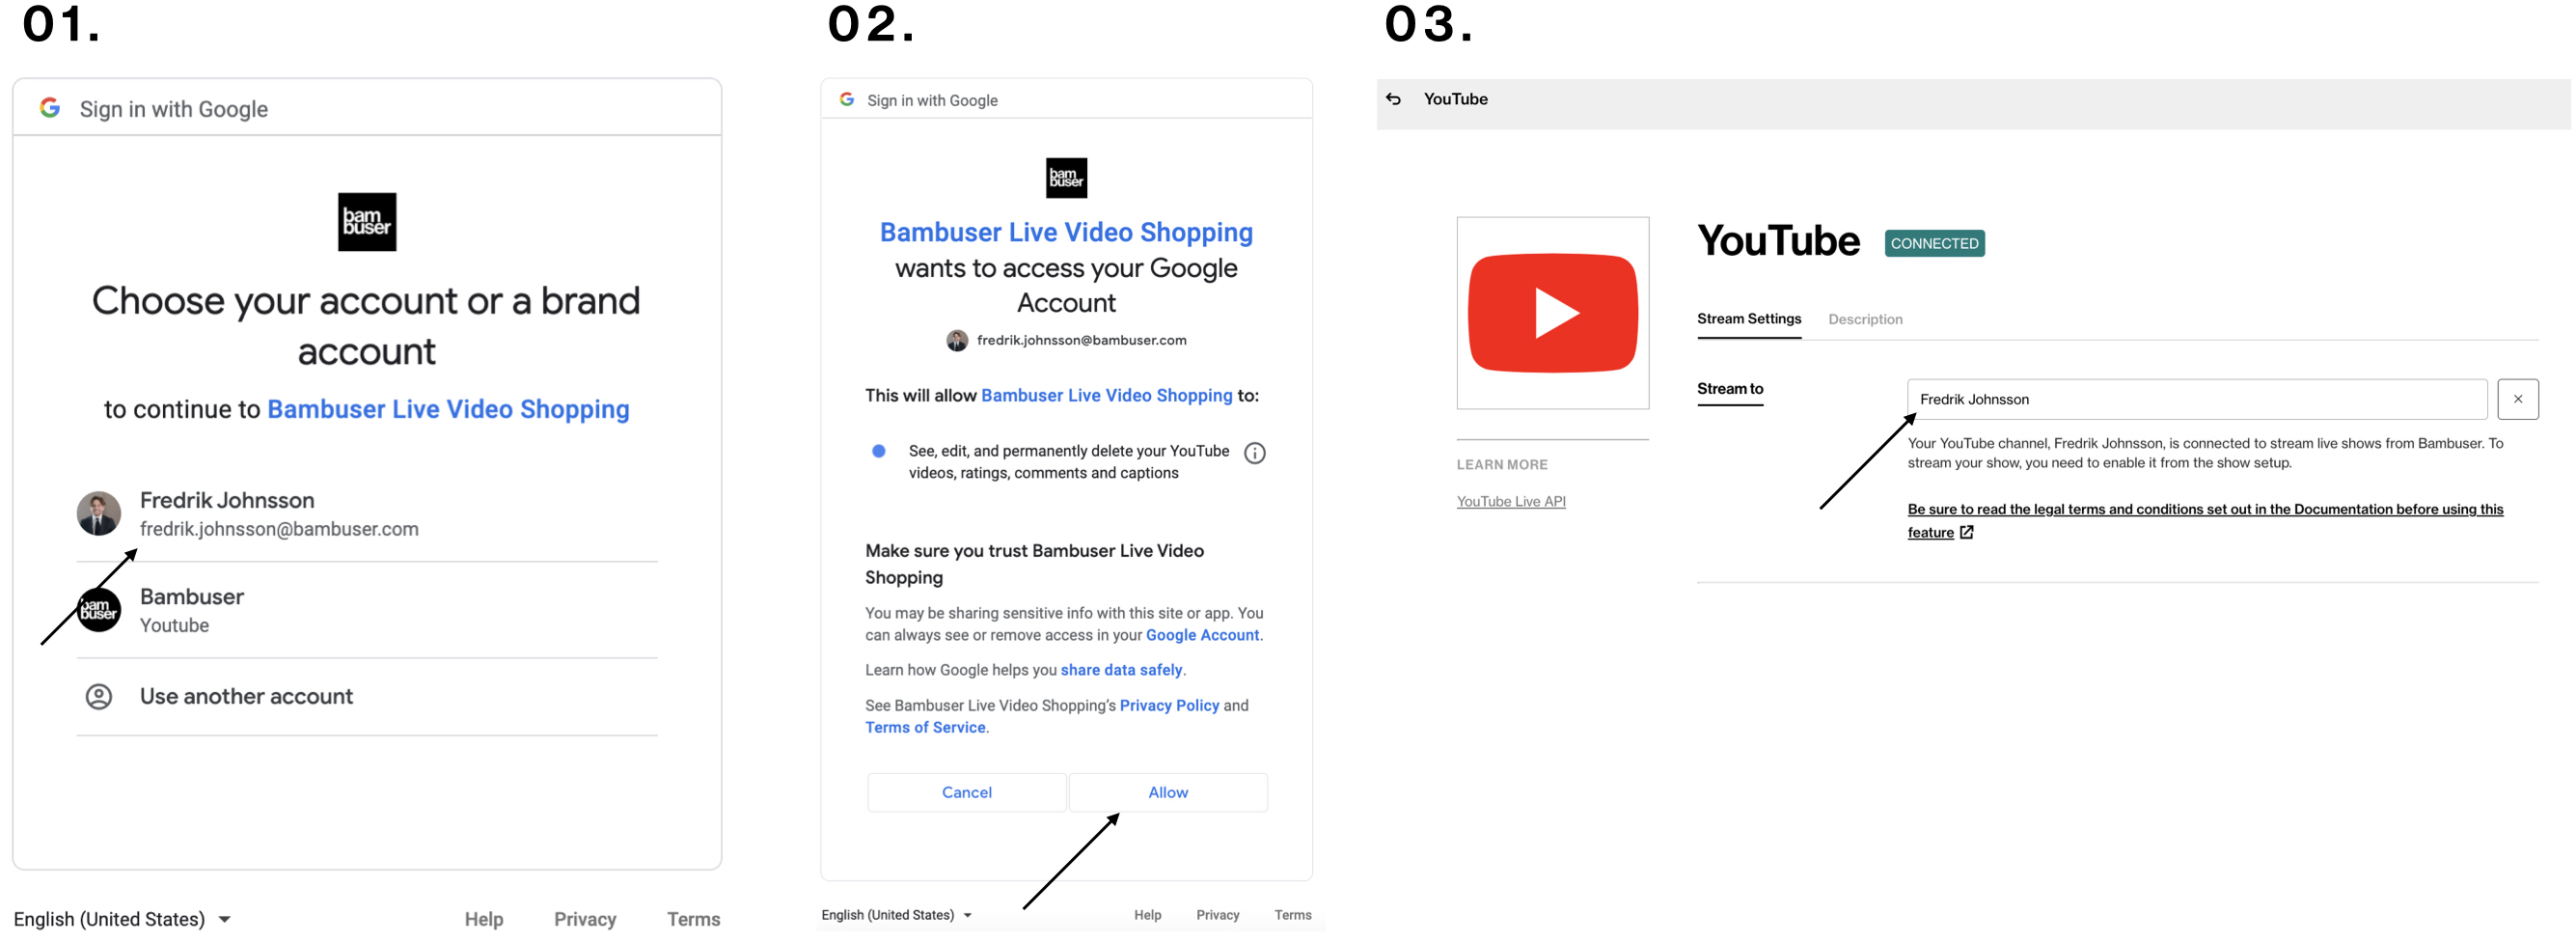
- Click the "Connect" button to the left
- Grant Bambuser access to your YouTube channel that you want to multistream
- After finishing the YouTube flow you will be redirected back to the Bambuser dashboard
- You should now be connected and your channel name is shown under 'Stream settings'
Note!
Currently, we only support streaming to one YouTube channel at a time. If you want to change the channel, please remove it and go through the connect flow again. If you wish to stream to more channels than one, see our custom RTMP solution
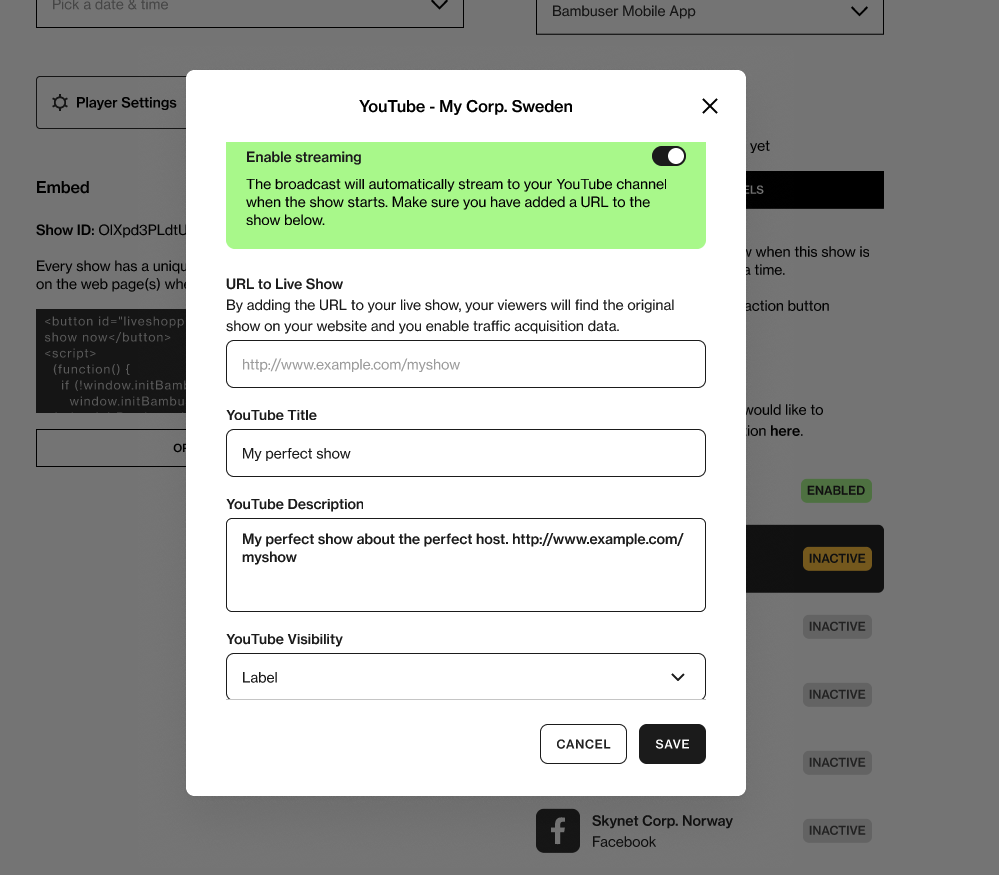
How to stream to YouTube
Navigate to the show setup page
- Beneath the label ‘Stream to other platforms’, click the "Choose Platform" button
- Select the platform you would like to stream to. In this case, it is YouTube.
- Fill in all the fields
- Embed URL: Add the URL to where the player is embedded. When you enter the URL, we will include it in the YouTube stream to make sure the viewer can navigate to the main show. The Embed URL will be appended to the description.
- Privacy status: This determines the visibility of the stream on YouTube
- Title: This will be the title of the YouTube stream
- Description: This will be the description of the YouTube stream
- Use the switch to toggle the feature on or off for the particular show, it is turned on by default
 |
 |
Please note: It is important to provide the correct embed URL during setup. This is to ensure that YouTube viewers can find the main live show on your website and to enable data tracking. Otherwise, they will lose some of the perks of the real live video shopping experience like being able to shop directly through the player and interact with the host(s). See the example above!
Important YouTube information
- YouTube only supports landscape mode fully, while you can stream with portrait mode it will not render fullscreen on mobile
You can only connect to one channel, if you wish to add more YouTube destinations see the custom RTMP section
In order to test the YouTube integration, the easiest method is to connect YouTube as a streaming destination while setting the privacy status setting to private. This ensures that only you can see the actual live video on YouTube.
As you go live, you will find your video in YouTube Studio under the tabs 'Content' and 'Live'. From there you can edit your video additionally if you want to e.g. set a category, playlist, change visibility etcetera.
Important: Before setting up your connection you must verify your YouTube account by visiting www.youtube.com/verify and then make sure you have enabled “Features that require phone verification”, it takes 24 hours for YouTube to approve this request.
5. Connect & stream using custom RTMP
Bambuser does support multistreaming via custom RTMP connections. You can go live on any platform that provides a stream URL and stream key. This means that you can stream to platforms that Bambuser does not yet (or cannot) support. However, it also does mean that there is a bit more manual setup required.
To add a custom RTMP destination you need:
- a stream URL
- a stream key
Most commonly they appear as you set up your stream on a platform. Note that many platforms provide the possibility to enable (if they do not already have it as default) “persistent stream keys”, which means that the stream key will not change the next time you want to start a stream on that platform.
By using persistent stream keys you do not have to go into the platform’s settings on the Bambuser dashboard and update the stream key for every new show. If you are unsure, simply visit the Bambuser dashboard → Settings → Integrations → on your RTMP platform and press the edit button (pencil symbol), and verify that the stream key is correct. Keep in mind that you still need to provide the title, description, and link to your main stream yourself each time.
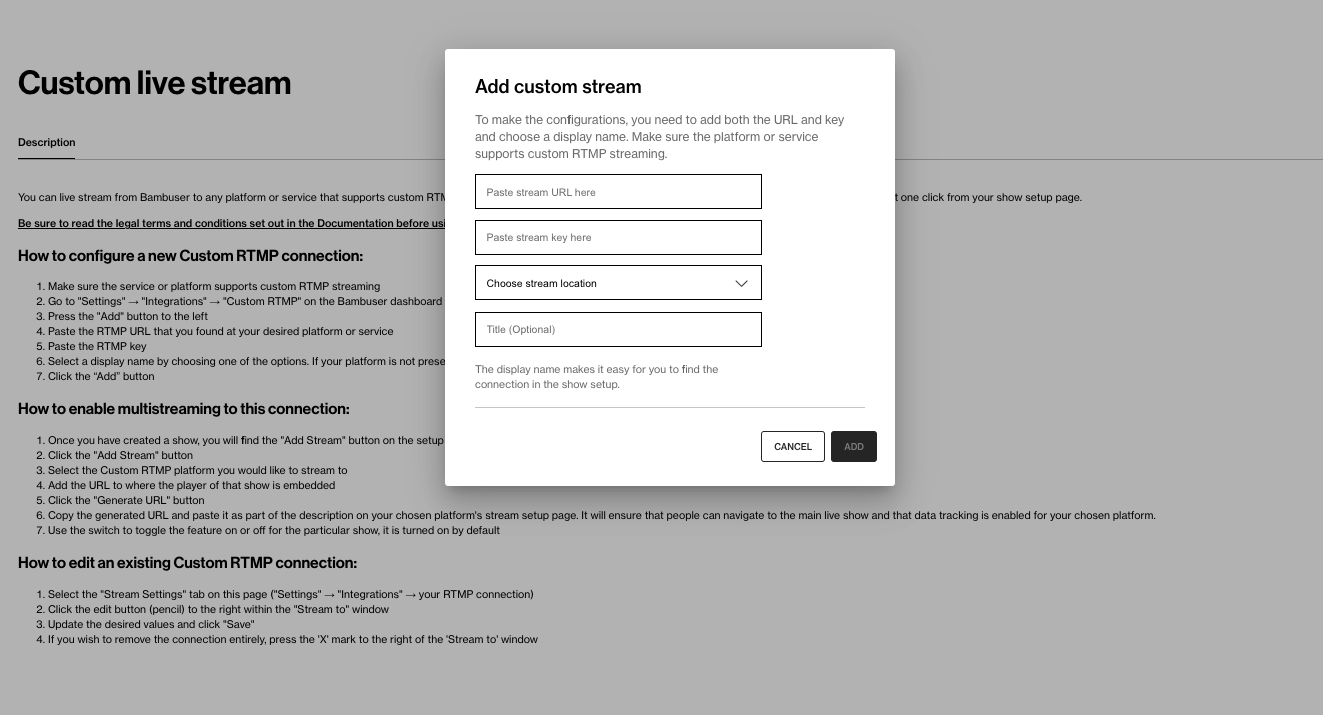
- Make sure the service or platform supports custom RTMP streaming
- Go to "Settings" → "Integrations" → "Custom RTMP" on the Bambuser dashboard
- Press the "Add" button to the left
- Paste the RTMP URL that you found at your desired platform or service
- Paste the RTMP key
- Select a display name by choosing one of the options. If your platform is not present, select Other
- Optionally add a custom display name to differentiate between different connections to the same platform
- Click the "Add" button
How to stream using your custom RTMP
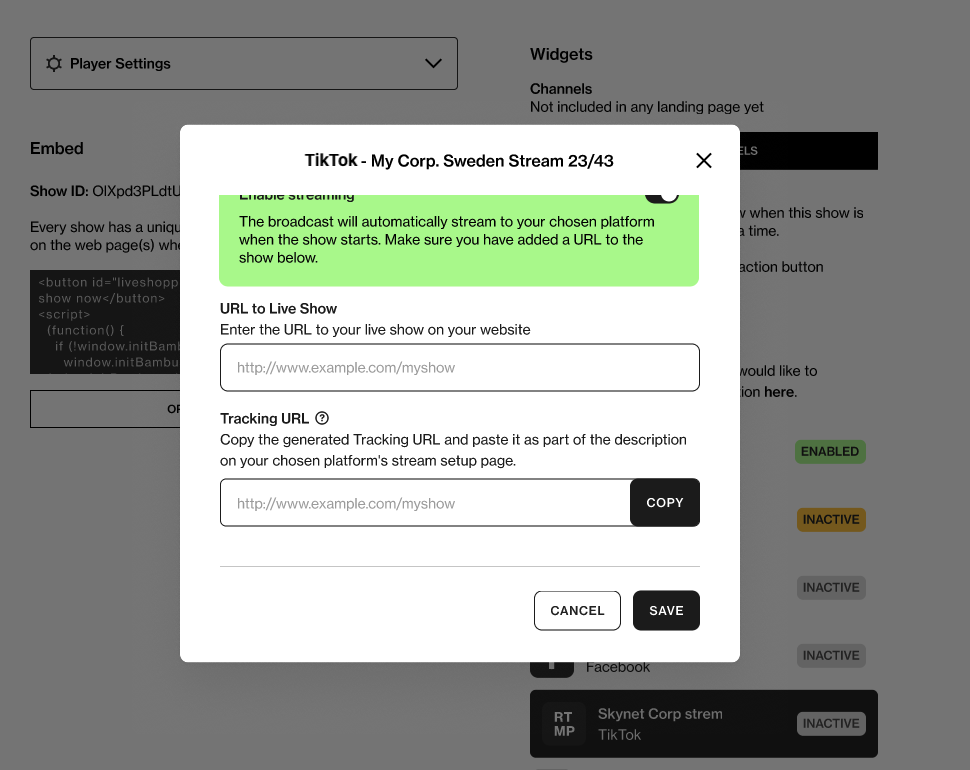
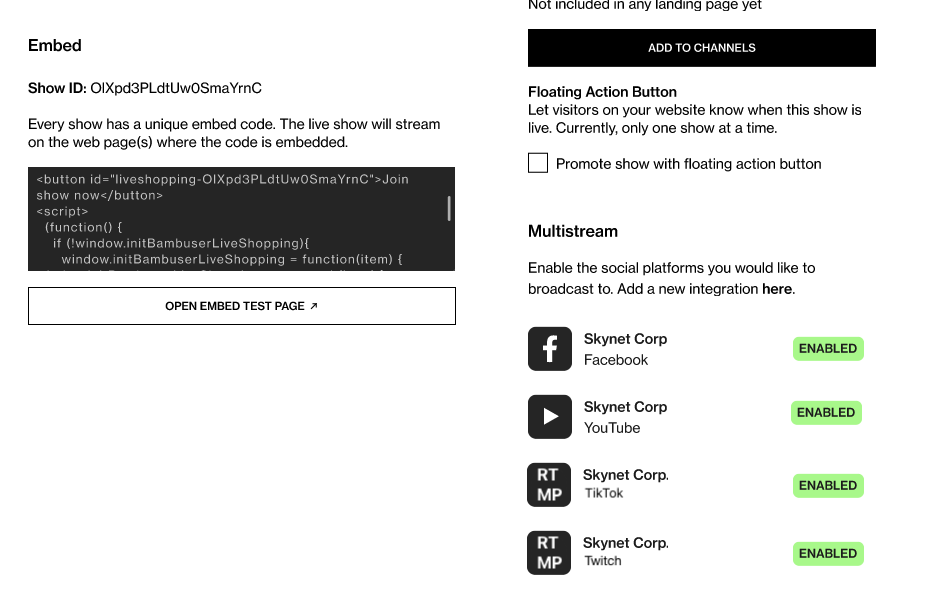
- Navigate to the show setup page
- Beneath the label ‘Stream to other platforms’, click the "Choose Platform" button
- Select the Custom RTMP platform you would like to stream to
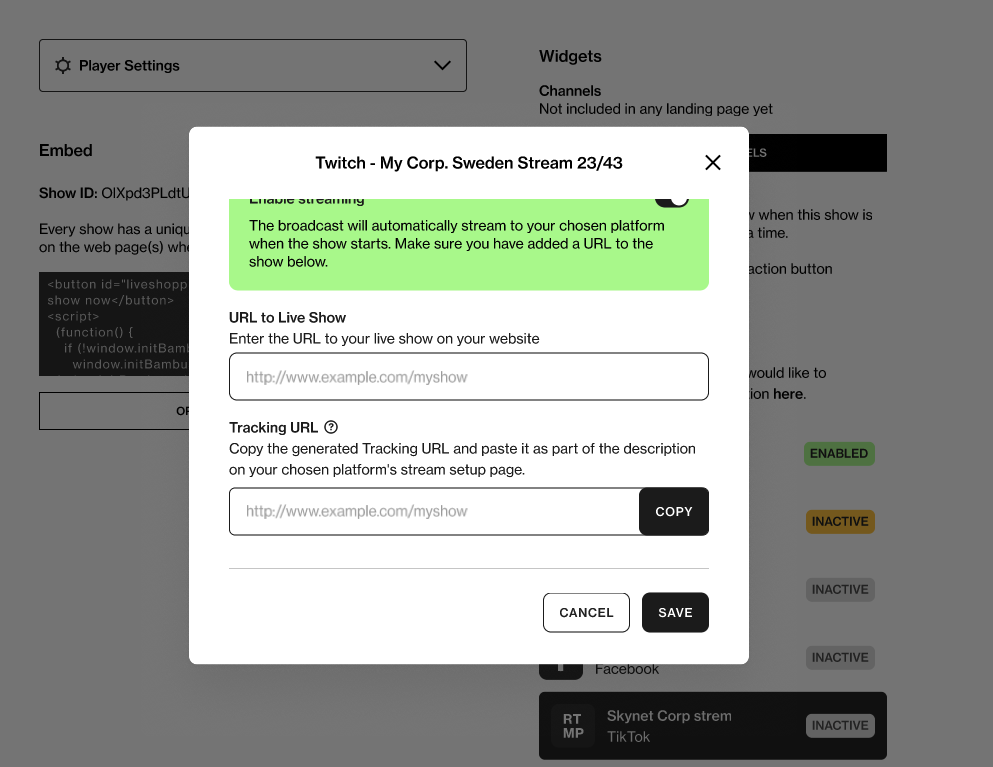
- Add the URL to where the player of that show is embedded
- Click the "Generate URL" button
- Copy the generated URL and paste it as part of the description on your chosen platform's stream setup page. This will ensure that people can navigate to the main live show and that data tracking is enabled for your chosen platform.
- Use the switch to toggle the feature on or off for the particular show
 |
 |
 |
How to edit an existing Custom RTMP connection
- Select the "Stream Settings" tab on this page ("Settings" → "Integrations" → your RTMP connection)
- Click the edit button (pencil) to the right within the "Stream to" section
- Update the desired values and click "Save"
- If you wish to remove the connection entirely, press the 'X' mark to the right of the 'Stream to' window
6. How to stream to Instagram Live
You can stream to your Instagram account either through the Bam Hub directly or via a custom RTMP connection. For instructions how to connect a custom RTMP, please refer to Connecting to IG via RTMP.
Disclaimer: Live Producer is only available for professional accounts and on desktop via instagram.com.
6.1 Connecting to IG via Instagram App
Before you connect: Facebook and IG need to be connected in your Facebook Professional Dashboard. This can be found by going to the FB business page in Settings & Privacy > Permissions > Linked Accounts.

Note:
Ensure that your dashboard and IG are both open as you will be transferring information from one to the other. IG tab must be open the entire time you are connecting + broadcasting. IG does not use static stream keys. If it is closed out, you must input new credentials.
In your dashboard, go to Settings > Integrations and click on the IG button to begin connecting.

Follow the steps provided for signing in.The process will route you through your FB account, have you log in to your IG account and then have you choose the pages and IG accounts you would like Bambuser to have multistreaming access to. Once permissions are saved, initial connection is done.
IMPORTANT
In the steps to log into your accounts, please ensure you select the following options shown in the images below (it is important that when choosing, you opt in to all current businesses/pages/accounts). You will have the option to choose which account you stream to later.

 .
. 
 .
.

Begin setting up your show and go to Multistream in the show setup and select Instagram. Toggle on Enable Streaming. You will see fields for a stream URL and stream key.


Open your IG account on a PC and click on Create in the left navigation panel and select Live Video.


Create a title and select your audience type.


IG will show stream details that need to be inputted in the fields to enable multistreaming. Ensure that you copy & paste the stream URL and stream key and save.

Go live as per usual via Bambuser. Feed will show in the dashboard and will be pushed to IG in ~20-40 seconds later. When you see the video feed in IG, click on the Go Live button on the top right corner. You will be able to see IG chat once live.

When the show has ended in Bambuser, the feed will end (with delay) on IG. Ensure that once feeds ends, click End Live Video.

Note:
If you do not click "end live video" on Live Producer, it will continue to display the final frame of you Bambuser stream while awaiting a new/continued video feed. In order to end your live video smoothly, ensure you end the broadcast on Live Producer (Instagram) once you see the last frame.
6.2. Connecting to IG via RTMP
Note:
Ensure that your dashboard and IG are both open as you will be transferring information from one to the other. IG tab must be open the entire time you are connecting + broadcasting. IG does not use static stream keys. If it is closed out, you must input new credentials.
Open your IG account on desktop and click on Create in the left navigation panel and select Live Video.


Create a title and select your audience type.


IG will show stream details that need to be inputted in your dashboard under Settings > Integrations > RTMP. Ensure that you copy & paste the stream URL and stream key to their designated fields and click “add” in the dashboard.


Go into your show setup and ensure that you enabled the RTMP option in the Multistream section.

Go live as per usual via Bambuser. Feed will show in the dashboard and will be pushed to IG in ~10-20 seconds later. When you see the video feed in IG, click on the Go Live button on the top right corner. You will be able to see IG chat once live.

When the show has ended in Bambuser, the feed will end (with delay) on IG. Ensure that once feeds ends, click End Live Video.

Note:
If you do not click "end live video" on Live Producer, it will continue to display the final frame of you Bambuser stream while awaiting a new/continued video feed. In order to end your live video smoothly, ensure you end the broadcast on Live Producer (Instagram) once you see the last frame.
7. Other social media platforms
LinkedIn
Currently, we only support broadcasting to LinkedIn via custom RTMP. It’s worth noting that you must be approved to become a “LinkedIn Live Broadcaster” before you can go live.
Twitch
While it is possible to live-forward video to Twitch without any technical difficulties there are some legal agreements that might or might not be applicable to you as a user (https://www.twitch.tv/p/en/legal/affiliate-agreement/). In essence, most partners and affiliates of Twitch sign an agreement that they have 24 hours exclusive right to whatever content you stream; this means, that you might violate their terms of service. However, if you are confident you are not violating any terms of service your organization has with Twitch you could still go live through custom RTMP.
8. Legal
By accessing or using this social media integration feature in any way, you warrant that you have the legal authority to amend any existing agreement between Bambuser and your company (herein referred as the “Customer”) for the provisioning of the Bambuser Solution with the following:
(i) Customer is fully liable for its use of the Bambuser Solution in relation to a social media platform;
(ii) Customer will be bound by the terms and conditions applicable for such platform; and
(ii) Customer understands that ownership of data, including any personal data, may transfer to the owner of the social media platform as further regulated in the terms and conditions applicable for such social media platform.
Bambuser hereby disclaims any and all liability in relation to Customer’s use of the Bambuser Solution in relation to any social media platform and Customer further agrees to fully indemnify, defend and hold harmless Bambuser, its affiliates, officers, directors, employees and agents of Bambuser and its affiliates, directly or indirectly caused by or incurred by reason of a third party allegation, lawsuit, claim or proceeding, penalty/administrative fine imposed by an authority arising out of or relating to Customers use of the Bambuser Solution in relation to any social media platform. Customers further acknowledge that any social media platform provider shall never be considered as a subcontractor to Bambuser. Any limited liability provision stipulated in an existing Agreement shall not apply to Customer indemnification obligation. The provisions contained in this clause shall supersede any conflicting provision in the existing agreement agreed between the parties.
9. Social Selling
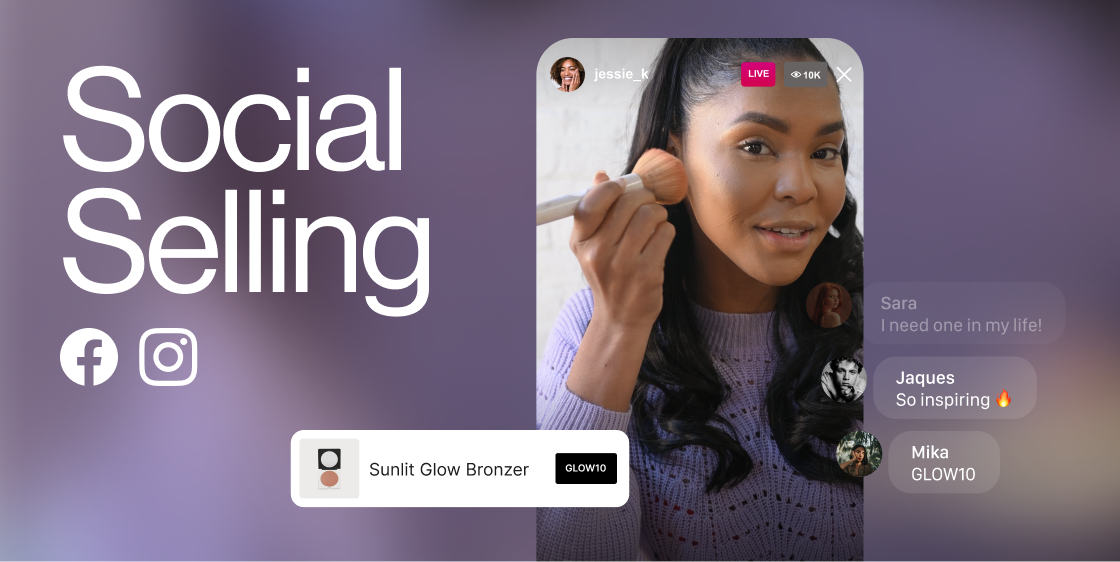
Social Selling facilitates the customer journey on social media by enabling viewers to shop directly from a video. By adding unique shop codes to featured products, the viewer is able to type the code of a product in the live chat and automatically receive a message with the link to that product’s PDP page - for an effective checkout.
To get started using Social Selling, please read this article.
Troubleshooting
- Troubleshooting: Multi-Streaming via RTMP
- Troubleshooting: Multi-Streaming to META
- Troubleshooting: Multi-Streaming to YouTube
- Troubleshooting: Social Selling Instagram DM not being sent
Frequently asked questions
Is it possible to name custom RTMP stream connections or differentiate them somehow e.g. 'YouTube x Influencer'?
Yes, simply add a custom display name for your connection as you create your connection. Or edit it at a later stage.
How to start from a "clean slate" if you suspect something has gone wrong with Facebook or Custom RTMP?
Simply remove and redo the connection under Settings → Integrations → your platform. This entails simply clicking the 'X' and going throw the flow again. After the new connection is done, then you can try again with a new show on the setup page.
Why am I getting the following alert? "Facebook/Instagram reconnection recommended."
There are two reasons you could be receiving an alert regarding your integration connection:
- As Meta updates their platforms, we also need to make adjustments to ensure that all connections and updates are aligned. This alert is created to ensure the most updated connection.
- Meta's authentication token typically is good for 60 days. There is the possibility that it lasts for longer. However, it is subject to change. Please read more regarding Meta's authentication tokens here.
In order to to ensure minimal interruption, we offer 2 warnings labels next to "settings" to update your integration connection:
- Red: When a token has expired, or is otherwise not usable
- Orange: When a token is about to expire (within a week) or is lacking certain permissions
Is it possible to stream with both landscape and portrait (16:9, 4:3, 9:16, 3:4)?
Yes, there is no additional setup you need to do, it will match the specs of the video you stream. Be aware that not all platforms support all formats
How does it look if you multistream via custom RTMP to different destinations?
It depends on the platform. Facebook supports portrait for mobile so then it will look as you expect with a portrait on mobile for Facebook (see 9.) YouTube on the other hand does not (see. 10.)
Is it possible to multistream pre-recorded videos?
Yes, it is possible
Is it possible to have multiple Facebook pages connected?
Yes, it is possible
What statistics do you track and where can we view them?
A lot of stats are visible on the platforms themselves - however, we do track how many people are clicking on the link pointing towards your website in order to be able to give you the conversion in absolute numbers and percentages.
Is it possible to stream to a Facebook group?
Yes. This is currently supported through custom RTMP only.
Is it possible to change the text "Published By Bambuser Multistream?"
This is only visible to the manager of the Facebook page. The viewers will not see this.
Is it possible to stream directly onto a specific event on Facebook?
Yes, this is supported by custom RTMP.
How does portrait/landscape/xyz mode look on platform x/y/z on mobile/desktop/tablet etc?
Due to the vast number of variations possible, we encourage you to try out desired platforms for yourself and play around with your preferred modes and variations. An easy way to do this is to record a short segment and go live with a test show using the pre-recorded feature we have at Bambuser. Most platforms support test live streams, private listings, or easy creation of new accounts for you to experiment with. However, we will update this document with photos of the most commonly used platforms and variations.
How long can we stream on Instagram Live before getting disconnected?
Instagram Live allows streaming for up to 4 hours for all account types (Personal, Business, Creator), provided your account is in good standing. Instagram does not provide an official policy link specifying this limit anywhere, so this is based on our testing and observations. For the latest information, check the Instagram Help Center: https://help.instagram.com/. We recommend streaming for less than 4 hours to avoid potential issues and suggest familiarizing yourself with what to do if a show goes down: https://knowledge.bambuser.com/mobile/what-to-do-if-a-rtmp-show-goes-down.
Can we stream from one RTMP source to multiple Instagram accounts simultaneously for a single show?